


1. 원리 설명
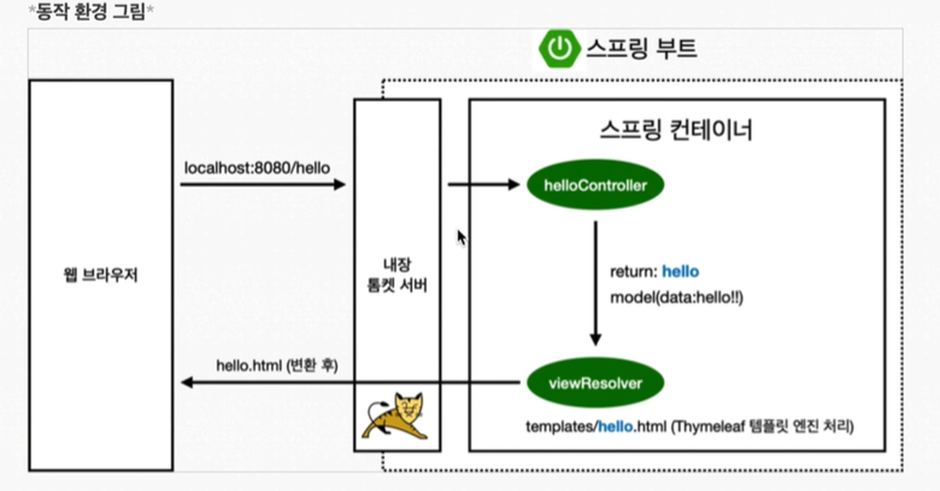
1) 웹 브라우저에서 localhost:8080/hello를 GET(조회)한다.
-(웹 브라우저에 Http URL을 치는 행위 자체가 GET 행위이다.)
2) 스프링부트가 내장한 Tomcat이란 웹 서버가 이걸 받아서 스프링부트에게 처리할 수 있는지 물어본다.
3) 스프링부트는 helloController가 GetMapping("hello")란 걸 가지고 있다는 걸 확인하고 여기서 일을 처리하도록 요청과
매칭 시켜준다.
-(GetMapping("hello") == ~URL/hello로 조회 요청이 들어오면 밑에 public 함수로 요청에 대응하라.)
-(public 함수는 model이라는 걸 가지고 있음 -> model은 attribute와 각 attribute 별 value를 가짐.)
-(여기서 model의 attribute는 한 개로 name: data, value: hello!! -> DB 사용 시 바뀔 수 있음)
4) public 함수의 Return “hello”; 의 의미 -> 리소스 밑에 템플릿에 있는 파일 중 hello.html를 찾아서 실행시켜라.
5) 컨트롤러가 리턴값을 최종 반환하면 뷰 리졸버가 화면을 찾아서 처리
2. 코드 분석
src/main/java/hello.hellospring(메인 패키지)/controller(신생 패키지 for 컨트롤러)/HelloController(java class)
package hello.hellospring.controller;

import org.springframework.stereotype.Controller;
import org.springframework.ui.Model;
import org.springframework.web.bind.annotation.GetMapping;

@Controller
//컨트롤러를 쓰기 전에 이와 같이 어노테이션을 써줘야한다.
//그래야지 Gradle이 컨트롤러 사용 시 필요한 라이브러리를 import 한다.
public class HelloController {

    @GetMapping("hello") // ~url/hello로 GET요청 들어오면 밑을 실행시켜 대응해라
    public String hello(Model model){
        model.addAttribute("data","hello!!");
        return "hello"; // resource/template에 있는 파일 중 hello.html을 찾아서 실행시켜라
    }
}
밑의 내용은 src/main/resource/java/resource/templates 밑의 하위폴더로 만든 html 문서이다.
<!DOCTYPE HTML>
<html xmlns: th="http://www.thymeleaf.org">
<!-- template로 thymeleaf 엔진을 사용한다.-->
<head>
    <title>Hello</title>
    <meta http-equiv="Content-Type" content="text/html; charset=UTF-8"  />
</head>
<body>
<p th:text="'안녕하세요. '+ ${data}" >안녕하세요. 손님</p>
<!-- ${data}는 controller clas 속 model의 attribute 였던 data의 value를 가져온다는 것-->
</body>
</html>
3. 외웠는지 확인
1. 그림보고 설명
2. @GetMapping("hello")의 뜻
3. return hello의 의미

