


0. tistory-card-stat 을 만들려고 한 이유
티스토리를 기술 블로그로 활용하고 있는데, 내가 티스토리에 쓴 최신 글 내용을 깃허브 프로필에 가져오고 싶었다. 옆동네 Velog의 경우, 이러한 갈증을 해소해줄 너무나 세련된 카드가 이미 존재한다.
만드신 분 깃허브 - enugyeole-velog-readme-stat
이렇게 자기 velgo 계정을 넣으면 내용이 보이도록 해주고 있다. 티스토리도 관련된 오픈 소스가 있는지 확인하기 위해 깃허브를 다 뒤졌지만 존재하지 않았다. 아 존재했지만, 더 이상 서비스를 하지 않고 있는 중이었다. 그릿 속의 해빗이라는 개발자 분 께서 Gihub Profile 전용 card-stat을 만들었으나, 더 이상 서비스 하고 있지 않았다.
왜 그런지 봤더니, 이유가 다음과 같았다.
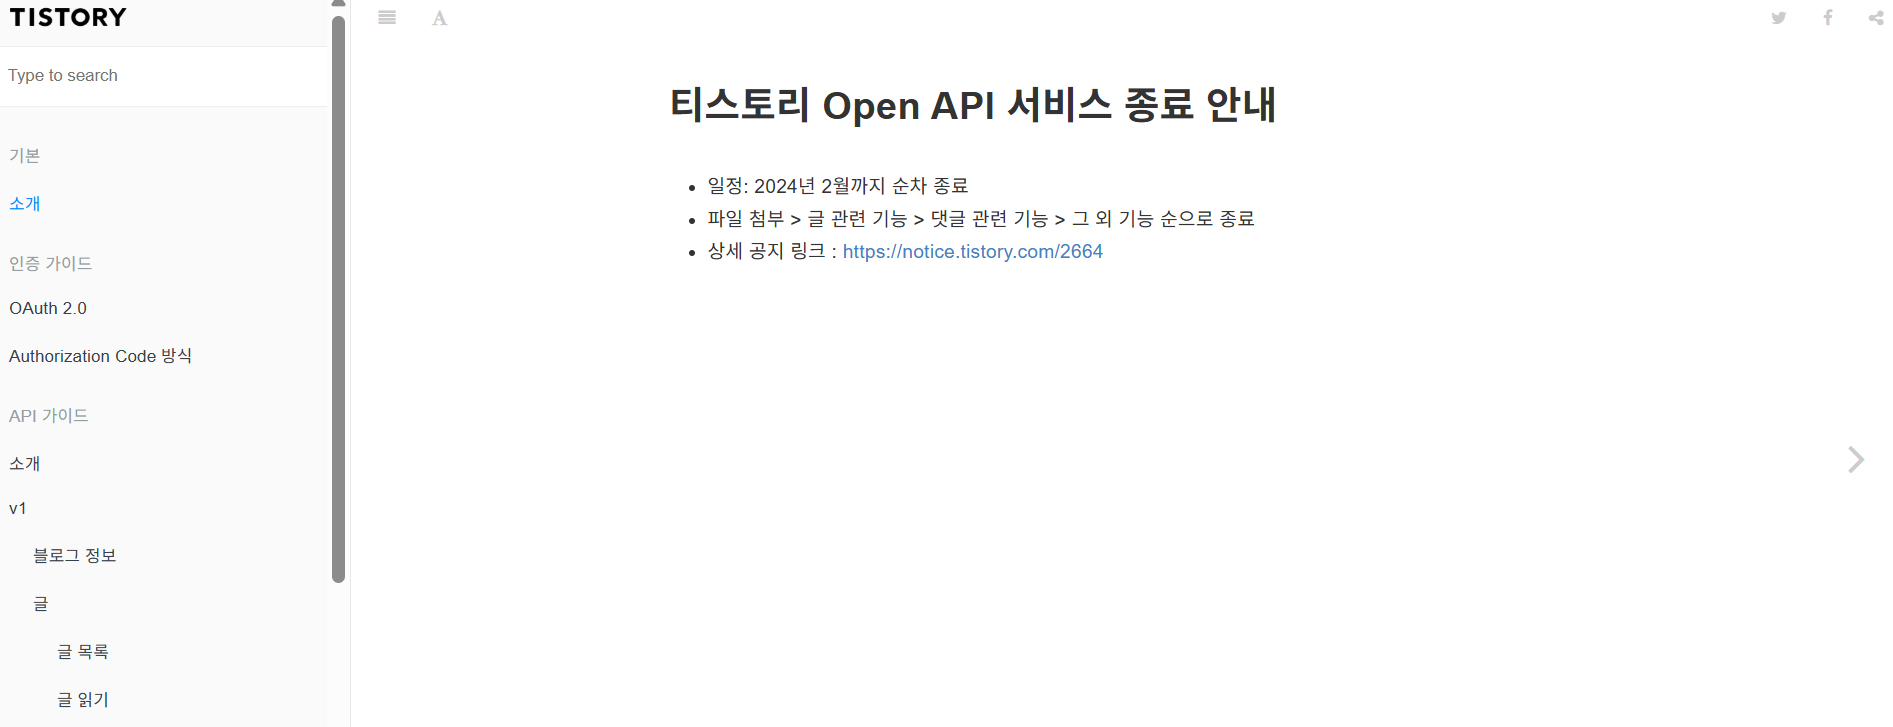
티스토리 API가 서비스를 종료해버렸다! 그래서 더 이상 그릿 속의 해빗 분이 만든 카드가 동작하지 않는 것이다!
물론 Python으로 그냥 a태그 형태의 최신 글 불러오기는 가능하지만, velog card 처럼 세련된 기능을 만들고 싶었다.
1. 현재까지 구현 사항
(0) 상황 파악
API를 활용해 블로그 내 여러 글을 보여줄 수 있는 Velog와 달리, 티스토리는 Open API 서비스 자체를 종료해버려서 선택지가 많이 없었다. 활용할 수 있는 것은 단지 TISTORY RSS 뿐이었다. 자신의 티스토리 홈 화면 뒤에 /rss를 치면 다음과 같이 나올 것이다.
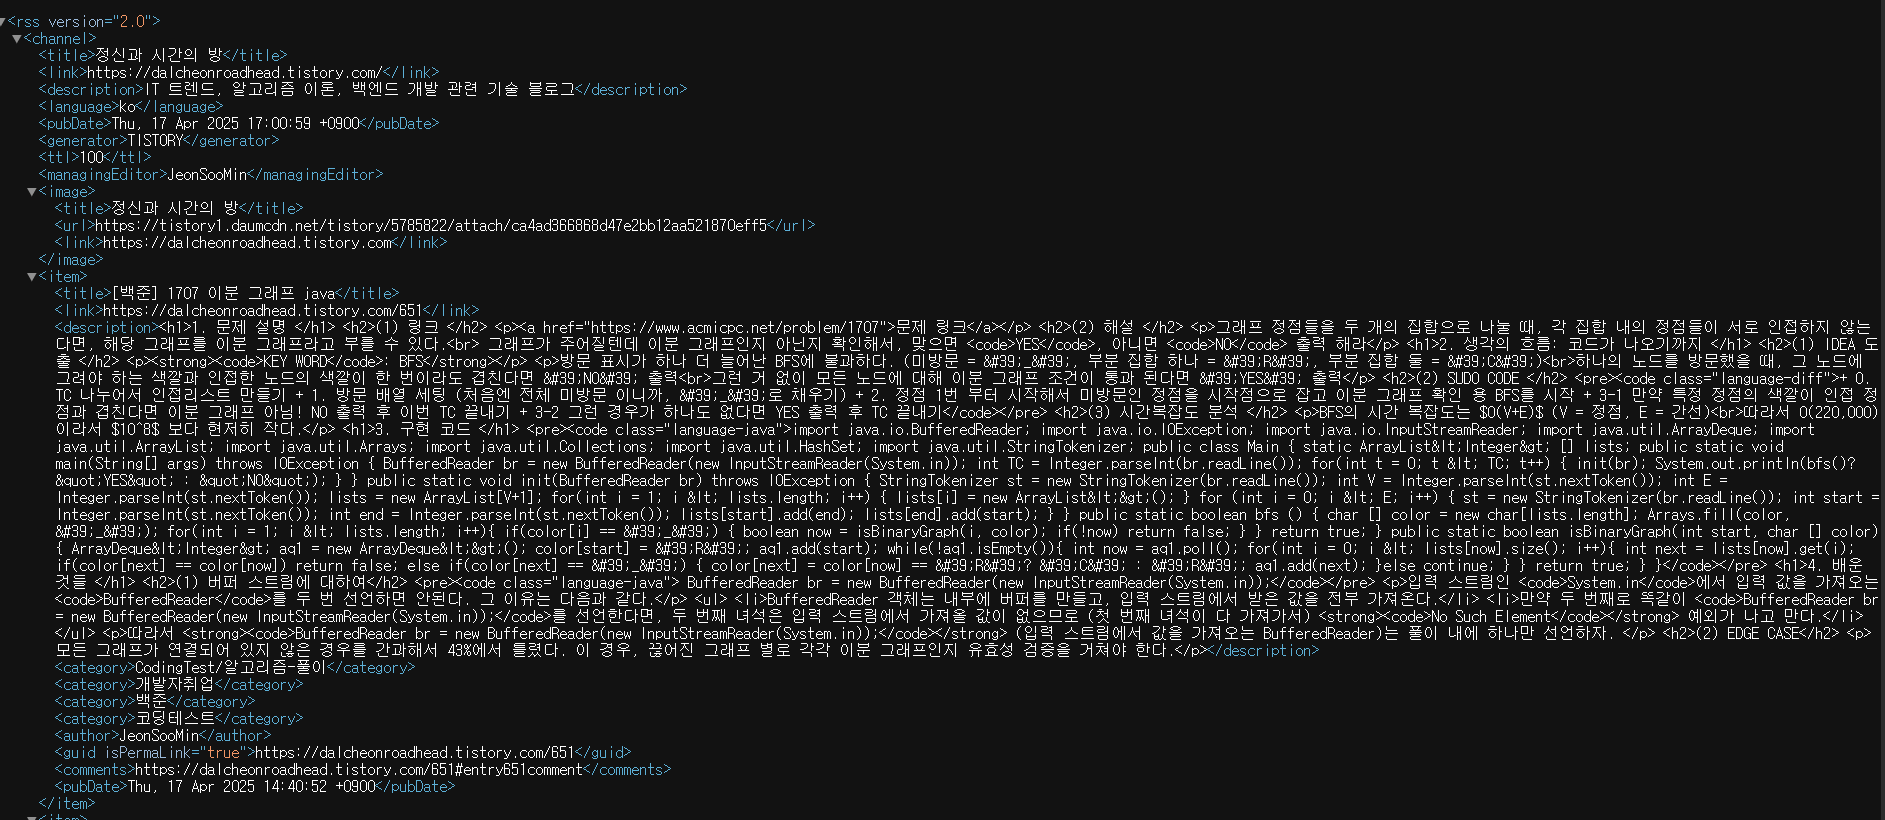
여기서 얻을 수 있는 것은, 내 블로그에 대한 메타데이터, 최신 글 10개 정도였다.
(1) 아키텍처
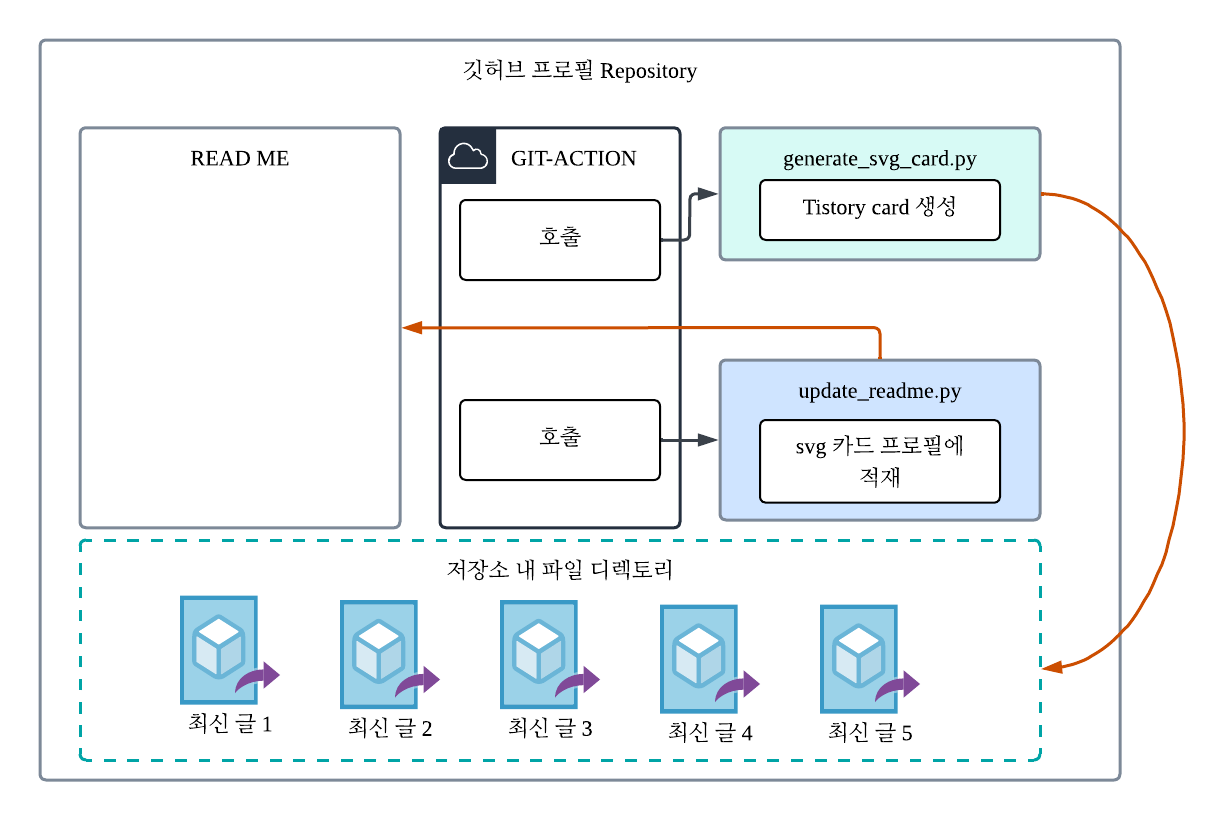
(2) Git-Action 용 Yaml
name: Update blog posts

on:
  schedule:
    - cron: "0 */6 * * *"
  workflow_dispatch:

jobs:
  update-readme:
    runs-on: ubuntu-latest
    steps:
      - name: Checkout repository
        uses: actions/checkout@v3

      - name: Set up Python
        uses: actions/setup-python@v4
        with:
          python-version: "3.10"

      - name: Install dependencies
        run: |
          pip install feedparser
          pip install cairosvg
          echo "설치 완료"

      - name: Generate SVG blog cards
        run: python scripts/generate_svg_cards.py

      - name: Update ReadMe
        run: python scripts/update_readme.py

      - name: Commit and push if changed
        env:
          TOKEN: ${{ secrets.GITHUB_TOKEN }}
        run: |
          git config user.name 'github-actions[bot]'
          git config user.email 'github-actions[bot]@users.noreply.github.com'
          git add README.md scripts/svg_cards/*.svg
          git commit -m "FEAT: Update recent blog posts" || echo "No changes to commit"
          git push https://x-access-token:${TOKEN}@github.com/${{ github.repository }}.git HEAD:main
되게 단순한 코드다. (짜는데는 오래 걸렸지만...)
Python 설치 ➜ generate_svg_card 실행 ➜ update_readme 실행(새로 만든 svg 파일 readme에 적재)
(3) generate_svg_card (티스토리 카드 생성기)
import feedparser
import os
from datetime import datetime
from xml.sax.saxutils import escape
import base64

RSS_URL = "https://dalcheonroadhead.tistory.com/rss"
MAX_ITEMS = 5
CARD_WIDTH = 600

def get_base64_image(path):
    with open(path, "rb") as img:
        return base64.b64encode(img.read()).decode("utf-8")

base_path = os.path.dirname(__file__)
svg_path = os.path.join(base_path, "svg_cards")
image_path = os.path.join(base_path, "asset", "tistory_background.png")
background_base64 = get_base64_image(image_path)

print("[DEBUG] base_path:", base_path)
print("[DEBUG] image_path:", image_path)
print("[DEBUG] 파일 존재 여부:", os.path.exists(image_path))


SVG_TEMPLATE = """
<svg width="600" height="200" xmlns="http://www.w3.org/2000/svg">
    <image href="data:image/png;base64,{background_base64}" x="0" y="0" width="100%" height="100%" />
    <text x="24" y="40" font-size="14" font-weight="bold" fill="#FFF2CE" text-anchor="{anchor}">dalchoenroadhead.tistory.com</text>
    <text x="24" y="80" font-size="18" font-weight="bold" fill="#FFF2CE" text-anchor="{anchor}">{title}</text>
    {tags_svg}
    <text x="24" y="180" font-size="14" fill="#FFF2CE" text-anchor="{anchor}">{pub_date}</text>
</svg>
"""

def format_tags(tags, x_offset):
    svg_tags = []
    current_x = x_offset
    for tag in tags:
        width = max(len(tag) * 8 + 15, 35)
        svg_tags.append(f'<rect x="{current_x}" y="125" rx="8" ry="8" width="{width}" height="20" fill="#FFF2CE"/>')
        svg_tags.append(f'<text x="{current_x + 6}" y="139" font-weight="bold" font-size="10" fill="#FF6969">{escape(tag)}</text>')
        current_x += width + 10
    return "\n    ".join(svg_tags)

def main():
    os.makedirs(svg_path, exist_ok=True)
    feed = feedparser.parse(RSS_URL) # Parsing 하기

    for i, entry in enumerate(feed.entries[:MAX_ITEMS]):
        try:
            title = escape(entry.title)
            if hasattr(entry, "published_parsed") and entry.published_parsed:
                date = datetime(*entry.published_parsed[:6]).strftime("%Y-%m-%d")
            else:
                date = "Unknown"
            tags = [tag.term for tag in entry.get("tags", [])] if "tags" in entry else []

            print(f"[DEBUG] {i+1}. {title} ({date}) - {tags}")

            svg = SVG_TEMPLATE.format(
                title=title,
                pub_date=date,
                tags_svg=format_tags(tags, 24),
                anchor="start",
                background_base64 = background_base64
            )

            filepath = os.path.join(svg_path, f"card_{i+1}.svg")
            with open(filepath, "w", encoding="utf-8") as f:
                f.write(svg)
            print(f"[OK] SVG 생성 완료 → {filepath}")

        except Exception as e:
            print(f"[ERROR] {i+1}번 entry 생성 실패: {e}")

if __name__ == "__main__":
    main()
내 티스토리 블로그에서 최신글을 가져와서
- parsing 한 다음,
- background 적용해서 카드 형태의 svg로 만든다.
- 이후 정해진 폴더 위치에 svg 카드를 저장한다.

위의 배경이 내가 만드는 svg 카드의 BackGround 이다.
(4) update_readMe.py
import os
import feedparser
from xml.sax.saxutils import escape

# 티스토리 RSS에서 최근 글 5개 파싱
feed = feedparser.parse("https://dalcheonroadhead.tistory.com/rss")
entries = feed.entries[:5]

SVG_DIR = "svg_cards"
README_PATH = os.path.join(os.path.dirname(__file__), "..", "README.md")
START_TAG = "<!-- BLOG-POST-START -->"
END_TAG = "<!-- BLOG-POST-END -->"

# GitHub Repository 이름 추출 (예: dalcheonroadhead/svg-blog)
repo_name = os.environ.get("GITHUB_REPOSITORY", "dalcheonroadhead/dalcheonroadhead")


# SVG → PNG 변환 및 README에 들어갈 <img> 라인 준비
svg_lines = []
for i, entry in enumerate(entries):
    link = escape(entry.link)
    svg_url = f"https://raw.githubusercontent.com/{repo_name}/main/scripts/{SVG_DIR}/card_{i+1}.svg"
    svg_lines.append(f'''
<a href="{link}" target="_blank">
    <img src="{svg_url}" width="600" height="200"/>
</a>
''')

# README.md 내용 갱신
with open(README_PATH, "r", encoding="utf-8") as f:
    content = f.read()

start = content.find(START_TAG)
end = content.find(END_TAG)

if start != -1 and end != -1:
    new_block = START_TAG + "\n" + "\n".join(svg_lines) + "\n" + END_TAG
    updated = content[:start] + new_block + content[end + len(END_TAG):]

    with open(README_PATH, "w", encoding="utf-8") as f:
        f.write(updated)
- 이미지 태그를 다시 최신글 URL 주소
a 태그로 감쌌다. - ReadMe 내에서 START_TAG 주석과 END_TAG 주석 사이에 값을 넣도록 하였다.
티스토리 카드의 위치를 원하는 곳에 넣는 것이 구현 시 힘든 부분이었는데, 필자는 readme는 readme 대로 꾸미고, 최신글은 최신글대로 넣고 싶었다. 그래서 저렇게 주석 사이에 값을 넣는 식으로 구현했다. 이렇게 구현하니, readMe 내에 최신글 포스트가 올라갈 자리를 정할 수 있어서 좋았다.
(5) 결과
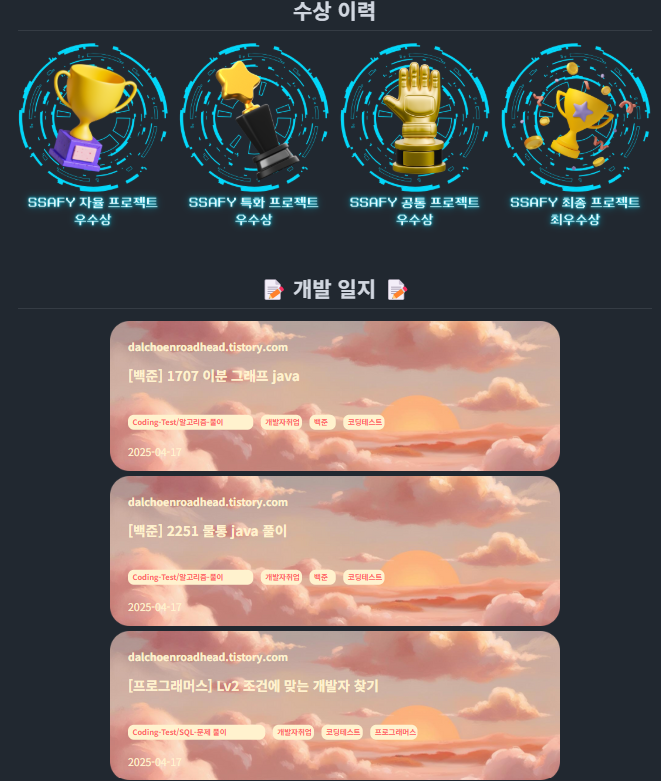
위와 같이 이쁘게 들어간다. 전체 확인하고 싶은 분들은 제 깃허브 프로파일로 와주시길 바란다.
2. 다음 구현
- Java/Spring이 무거워서 간단하게 Python Script로 구현했지만, 아무래도 Serveless 앱으로 구현하려면, Spring으로 하는 게 좋지 않을까 생각을 한다.
(알아보니 Vercel에서 Spring 지원을 안한다... ㅠ ) - 사용자 이름을 동적으로 받아 저렇게 이미지 파일로 바로 주는 방식에 대해서 어떻게 구현하면 좋을지 더 알아봐야겠다.
3. 추신
만약 현재까지 구현한 부분을 직접 리드미로 쓰고 싶은 분들은 파일 드리겠다.


